Friday, November 30, 2007

Hand Carved Stamps Tutorial Part 2


Whew!
The weather has been unseasonably rainy this week
and I thought I wouldn't have time to do Part 2 of the tutorial,
but the sun came out this morning :)
I'll be adding the explanatory text over the weekend
...I didn't want to leave you hangin'
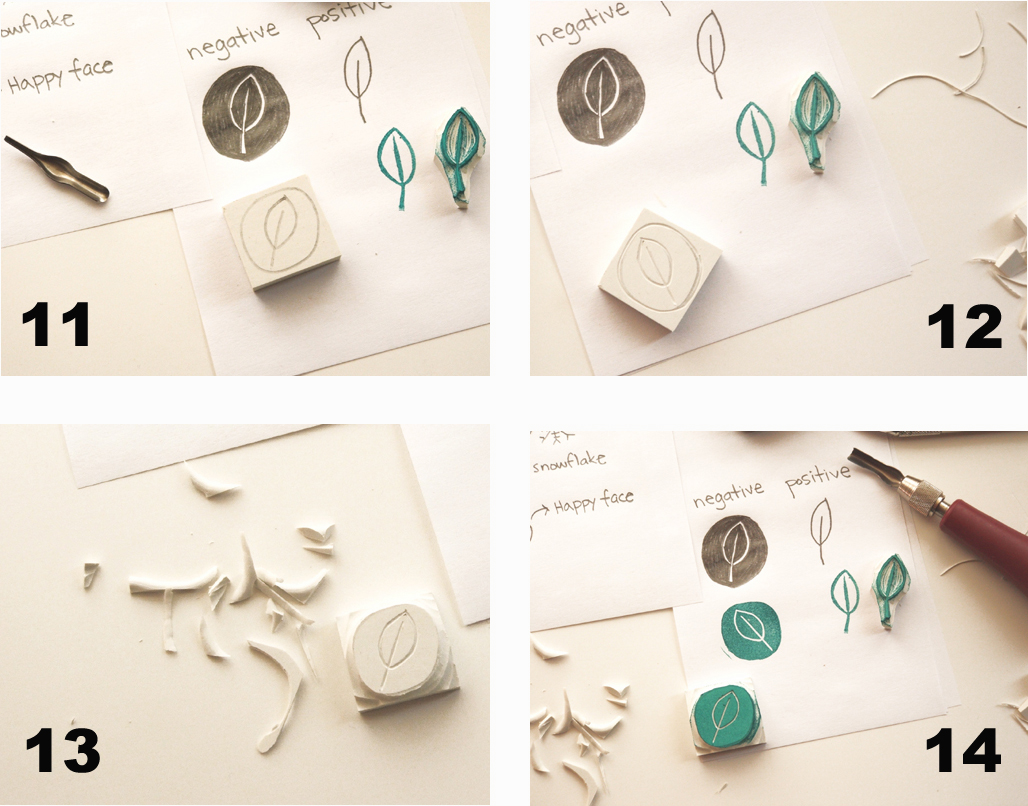
I bet you can even start carving by just looking at the pictures.
This tutorial was done with plain white erasers. you don't need to have
a special carving block to make simple & fun stamps.
Click on the images to see them LARGER
and look at all the details.
Part 3 next week!

Have a lovely weekend friends.

Labels:

13 Lovely Comments:

Blogger ALEJANDRA said...

Hello Geninne! your tutorial it`s very good!! Thanks for this. What material use, another block? In Guatemala don`t have block for this. Can i`use a eraser?

Thanks for your help!!

Many hugs from Guatemala

11/30/2007 2:11 PM  
Blogger zime said...

Gracias Geninne!!! Por tomarte tanto trabajo... este tutorial está increible!!
Un beso
(^v^)

11/30/2007 3:02 PM  
Blogger Lori Pickert said...

wonderful tutorial, geninne! :^D

11/30/2007 6:16 PM  
Blogger Marcela Calderón said...

¡Mis millones de gracias! Tan, pero tan didácticas tus fotos... ni hace falta la explicación escrita! Y a mí me viene bárbaro ver en primer plano los tamaños y formas de las gubias. Mi maridín me las va a comprar esta semana, y como no se consigue la que vos tenés, lo mando con la explicación de cuáles necesitaría... Agradecidísima!
Que tengas un lindo fin de semana!

11/30/2007 6:37 PM  
Blogger flora said...

Thank you Geninne!! I got all the supply I need last week and I am gonna start making some stamps! Hopefully they would turn out alright!!
Your tutorial is so wonderful and clear already without too much explaination! Thank you so much for being so generous!!!
:)

11/30/2007 6:45 PM  
Blogger casey said...

Thank you for this great tutorial!! I am dying to start making my own stamps!! :D

11/30/2007 8:11 PM  
Blogger Cyncontemporary said...

Gracias Geninne por el tutorial, esta super super bien tan solo con las fotos te das cuenta. (que bueno que salio el sol no?

Un beso

12/01/2007 12:33 AM  
Blogger ALEJANDRA said...

Me entendiste mi mal inglès? jijij! Hago el intento, pero si no me entendiste mi enredo. Te preguntaba si què otro material es similar al block para hacer el sello, te lo cuento porque averiguè por todos lados en Guatemala, pero parece què nadie tiene idea de lo que hablo.

Gracias por tù ayuda y por tan bien explicado tutorial!!!

Ale

12/01/2007 6:35 AM  
Blogger Veroka said...

Gracias Gennine!!! Siempre tan generosa! genial genial!
besos

12/01/2007 11:25 AM  
Blogger crazyQstitcher said...

Without Fiona of Love Fibre to point the way to you, I would have missed a wonderful site.
I will be going through your archives over the weeks, as what I've seen so far is fabulous.
Thanks for sharing your tute on stamp making.

Have a great Christmas.

12/17/2007 1:12 PM  
Blogger  said...

what a brilliant tutorial, thanks! i am now armed with all the necessary equipment and am going to give it a try!

12/19/2007 12:36 AM  
Blogger mein™ said...

Hello Geninne! Your clearly illustrated tutorial came at a perfect time as I am picking up stamping. I am certainly recommending it to readers! I would dearly recommend the book Enjoy My Handmade Life by Keiko Kuma to beginners too. xoxo

12/21/2007 10:34 AM  
Blogger andrea said...

hi--i just happened upon your lovely blog via sugarloop's post on your block printing post! what a lovely blog, and a wonderful tutorial! it makes me want to run out and get supplies to get carving right away! thank you!

2/23/2008 11:58 AM  

Post a Comment

<< Home